Advanced Analytics for Disc Golf: Baby’s First Superset

What’s more fun than having a hobby? 

Using technology to take the fun out of that hobby, of course.

A few months ago I got into disc golfing, which is similar to regular golf, but actually enjoyable. Jokes aside, you toss frisbees at baskets, usually hundreds of feet away. The app UDisc allows players to track and post their scores, as well as download their scorecards as CSV data. This opens the door for analytics shenanigans.

At work, one of my main tools is the data visualization software Tableau. Think of it like Excel’s charting system, but far more advanced. However, Tableau is no longer offering personal licenses, and business licenses start at several hundred USD. Thankfully, there is an open source alternative that runs entirely in a Docker container hooked up to a web interface. Enter Apache Superset. 

Installing and configuring Superset was a breeze:

$ git clone https://github.com/apache/superset.git

$ cd superset

$ docker-compose -f docker-compose-non-dev.yml up

Unfortunately, I wasn’t able to get the Google Sheets driver to work with it. From cruising their issue tracker on GitHub, it looks like the functionality is dubious at best. Oh well, I’ve got other routes for getting the data into the system.

The Data -> Upload a CSV button doesn’t quite work the way you think; you’ll first need to prepare a database to receive the CSV. I actually wasn’t able to figure out how to set up a new database, but it probably has something to do with the fact that Docker closes all unspecified ports. 

Regardless, the easiest solution was to go to Data -> Databases, then edit the example database. I set the name to “local” and used the “Advanced -> Security” tab to enable CSV uploads. 

Once a database is set up to receive it, you can use the “Upload a CSV” menu item to do the thing. Neat.

I had quite a few bumps while attempting to figure out the basics. I’ve written loads of SQL, HiveQL and Tableau QL for work. However, this was my first time in PostgreSQL and there was a bit of a learning curve. For starters, whose brilliant idea was it to refer to column names using double quotes instead of backticks, single quotes, or even brackets???

But, I digress. With a little copy/paste magic I was able to get my first viz put together: the total number of throws per game, per player, arranged over time:

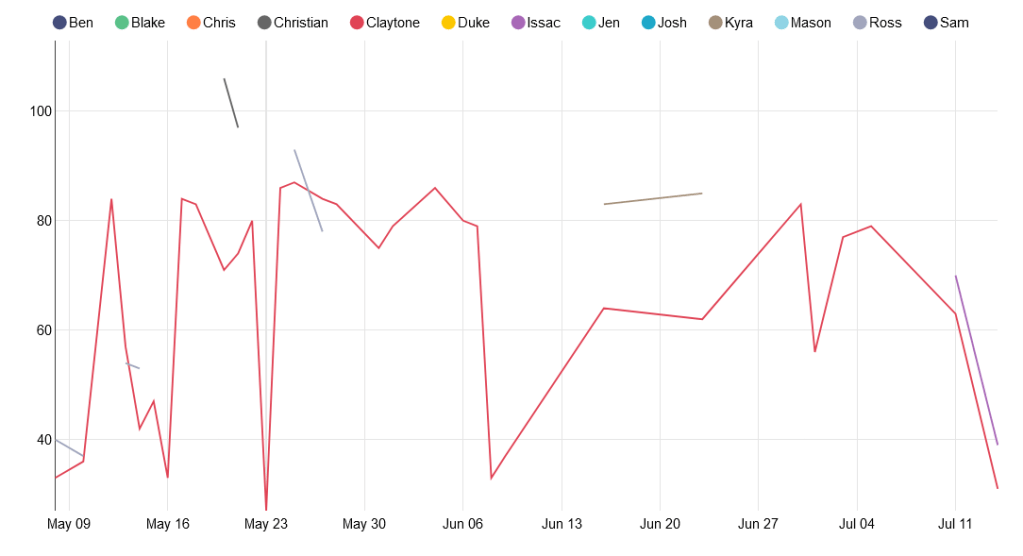
Unfortunately, since unplayed holes are marked 0 instead of null, this chart is not useful at all. We actually play all 21 holes less than half the time. For the chart, I can do a lot better. 

For my next experiment, I created another CSV with the par value for each of the 21 holes, and full joined it to the scorecard data so that I could count the strokes over/under par for each hole. For example, a bogey would have a value of 1, and a birdie would have a value of -1. Then I filtered out holes with a value of -1*par because they were unplayed. 

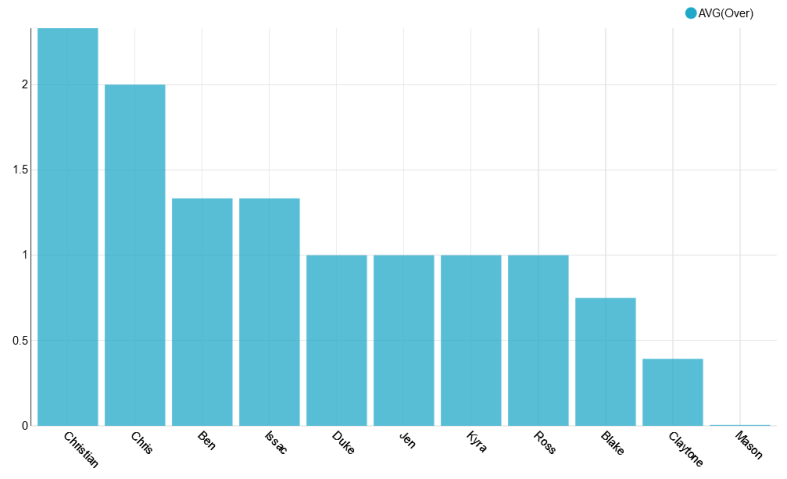
It allowed me to create this little viz: the average throws over par for the first hole on the course:

This is cute, but is a lot of work and requires a pretty verbose query. And since I don’t want to manually create a chart for every hole, we’re going to need to pivot the scorecard data. In 5 minutes I could write a script to do it, but the goal of this project is learning, so tomorrow I’ll attempt to do the pivot all in PostgreSQL.

Until then, happy coding.

VoxyGen YAML Is Here!

Today I took an important step in VoxyGen: YAML compatibility!

For the uninitiated, YAML is a simple data presentation format designed to be human readable and editable. 

Eventually, I’d like VoxyGen to be fully usable (and scriptable) by non-programmers, so this is a great start. Right now, VoxyGen “scripts” contain a bunch of parameters for creating generative voxel pieces. I’m saving them as .vxgn files, even though technically they follow the YAML syntax exactly.

Here’s a simple example of a script that generates pyramid shapes (spires command with decay_rate=1), then overwrites them with rectangular prisms (spires command with decay_rate=0).

---
pyramids-n-spires:
x: 50
y: 50
z: 30
script: [
{
name: spires,
spawn_rate: 0.01,
growth_rate: 1,
width: 15,
decay_rate: 1,
color_offset: 5
},
{
name: spires,
spawn_rate: 0.05,
growth_rate: 0.8,
width: 3,
decay_rate: 0,
color_offset: 10
}
]

You may use some, all, or none of the named arguments for functions named in the wiki. If you don’t specify the value for an argument, a default value will be used.

This is the result! 

It also looks very snazzy with half of the materials set to glass shaders.

This update is available in the Voxygen Gitlab repo

Revamping VoxyGen

After a few busy months of other projects, I’m ready to knock the dust off of VoxyGen!

If you’re not familiar, voxels are essentially the 3d form of pixels. You can use these little blocks to make some staggeringly beautiful scenes, robust interior designs, fun data visualizations, and of course, giant robots. My pal megavoxels on Instagram does an excellent job curating voxel art if you want to see some great examples.

Voxygen is substantial extension for the py-vox-io package, allowing users to turn mathematical expressions and geometry commands into Magicavoxel .vox files. The goal of VoxyGen is to implement a domain-specific language with which users can easily create generative voxel art. Ultimately, I’d like to interface this with a browser client or Discord bot or something to allow super easy access.

Since it’s been about six months since I opened the project, of course I had to do some fiddling with dependencies. When importing py-vox-io, you use an internal package called pyvox like so:

import numpy as np
from pyvox.models import Vox
from pyvox.writer import VoxWriter

PyCharm attempts to fill this dependency with pip install pyvox, which unfortunately does not work, as it gets confused with an old medical imaging package (actually called pyvox) from 2006. You’ll receive the error:

ERROR: Could not find a version that satisfies the requirement pyvox (from versions: none)

To rectify this, one can simply pop open the PyCharm console and type pip install py-vox-io

Sweet.

It’s alive! Something you may notice is the obfuscation of x, y, and z dimensions from the user. This is because, for some odd reason, py-vox-io regards the second dimension as vertical. I’ve seen this in a few other places before, namely older style modeling tools like Blockbench. Personally, I find it absolutely egregious and I’m willing to take great pains to right this wrong.

Let’s do something a little more exciting. I revamped a fun little function called generate_spires:

The code behind the scenes is still a bit of a mess, but the results are pretty neat. Here’s a few more generative pieces from the spire function.

Neato. Next time, I’ll refactor the spires function for efficiency and maybe add some new toys to the mix. If you want to follow the project, it’s on GitLab. Happy coding!

Reworking Vox2Obj

While making Vox2Obj user-friendly for a friend yesterday, I noticed that MeshLabServer had actually been deprecated in favor a Python package called PyMeshLab. This is great news! Except for the fact that, ya know, I had already built my pipeline around MeshLabServer. 

So today, against my better judgement, I’ve redone the pipeline with PML instead. As far as ultra-complex APIs go, I must say this is the most well-documented one I’ve ever encountered. For once the quick start guide actually got me quickly started, and scripting was not terribly difficult. The code is available at the Vox2Obj repo.

Pictured above are my progress models from development tonight. Getting the shading to land right was a little weird; using Merge Vertices By Distance resulted in some very strange shading on every edge. However, Merge Duplicate Vertices created desired results. Weird.

For some reason, I still can’t get the texture to stick when I don’t triangulate the mesh first, meaning I have at least twice as many polygons as I should. Oh well. Eventually I’ll pop over to the MeshLab forums and get somebody to help me with uniting same-color-and-orientation faces to create truly optimized meshes. 

Until then, happy pipelining.

Creating Vox2Obj

In 2020 I made many voxel models of varying degrees of complexity. Some highly stylized little ships, some giant robots. However, voxel editors can only do so much, and animation is not possible (at least in Magicavoxel). 

So I began importing my voxel models to Blender, a free Maya alternative I’ve used for nearly 8 years now. Unfortunately, there were a few problems. 

Ephtracy, brilliant though they are, did not build an amazing .obj exporting feature into Magicavoxel. The geometry generated was pretty bad, and each object required individual editing to fix errant topology. 

Here’s an example: the corner of this mesh is disconnected, and also a duplicate vertex! This can make for bad calculations of normals, which will mess up shading and possibly cause z-fighting among redundant geometry. Not ideal!

There’s also the problem of marching cubes. When exporting from Magicavoxel, marching cube voxel shapes are only supported in .ply and .mc formats, but in both cases, models lose their textures when imported into other engines. These formats also suffer from sub-optimal geometry problems.

Enter MeshLab, a free tool that can do… well… basically anything to meshes. 

The tool is open source and extremely powerful, but not very user friendly. It took a TON of fiddling with different options to get something that exports consistently. And if you have a Magicavoxel scene with a ton of objects, you’ll be stuck clicking through the same options on MeshLab (or Blender) over and over. 

I’ve created Vox2Obj to ease this process, and the results are excellent. For each object in your scene, the manual MeshLab process can take upwards of a minute, even with a practiced hand. With Vox2Obj, the meshes are optimized in a few seconds per object.

Take this model for example:

This guy has 33 moving parts! At a minute each, you’re looking at over half an hour of clicking through menus and typing file names. With Vox2Obj, you’re on your way in seconds. 

And believe me, that geometry optimization is amazing. Along with marching cube functionality and baked-in textures, you’d be crazy not to use it.

Here’s a before and after:

Usage documentation, code, and information on how to contribute are all located in the Vox2Obj Gitlab project

Happy voxeling!